Provision users and groups with OneLogin (SCIM)
System for Cross-Domain Identity Management (SCIM) is an open standard protocol for automated user provisioning. In Harness, automated provisioning involves creating users and user groups, assigning users to groups, and managing some user attributes (such as names and email addresses). In addition to creating users and groups, automated provisioning also edits and removes users and user groups as and when required.
If OneLogin is your identity provider, you can efficiently provision and manage users in your Harness account. Using OneLogin's SCIM integration with Harness enables OneLogin to serve as a single identity manager, to add and remove users, and to provision user groups. This is especially efficient for managing users at scale.
This topic describes how to use a OneLogin SCIM integration for automated provisioning in Harness. To configure this integration, you must take steps in both OneLogin and Harness.
With the OneLogin SCIM integration, don't change provisioned users' email addresses in OneLogin. Once a user is provisioned in Harness, the user's email address must remain the same. If you change the email address in OneLogin and then try to remove the user from Harness, the removal will fail.
Requirements
You need an understanding of:
- System for Cross-domain Identity Management (SCIM).
- Harness' key concepts.
- RBAC in Harness.
You must be an Administrator in your OneLogin account, and you must be an Account Admin in Harness.
You need a Harness API key and unexpired token that has all Users and User Groups permissions. API keys inherit permissions from the user they are associated with. If you use an API key for a service account, make sure the service account has all Users and User Groups permissions.
Add the Harness app to OneLogin
For more information, go to the OneLogin documentation on Adding apps.
-
In OneLogin, go to Applications and select Add App.
-
Search for
Harness, and select the Harness app. -
Select Save.
-
In the Harness OneLogin app settings, in the SCIM Base URL field, enter
https://app.harness.io/gateway/ng/api/scim/account/ACCOUNT_ID. ReplaceACCOUNT_IDwith your Harness account ID. You can get your account ID from any Harness URL or by navigating to Account Settings and Overview in Harness.For Harness On-Prem, the URL uses your custom domain name and omits
gateway. For example, if your On-Prem domain name isharness.mycompany.com**, then your SCIM base URL ishttps://harness.mycompany.com/ng/api/scim/account/ACCOUNT_ID. -
For SCIM Bearer Token, enter your Harness token. The SCIM Bearer Token authenticates requests and responses sent between the OneLogin SCIM provisioning service and Harness.
-
Make sure API Status is enabled.
-
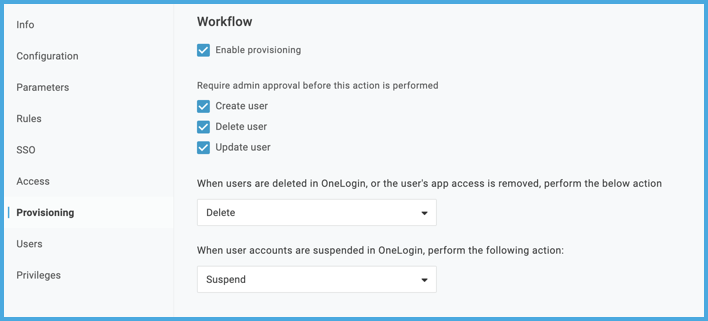
Go to the app's Provisioning settings, and configure the following:
- Select Enable provisioning.
- Under Require admin approval, select Create user, Delete user, and Update user.
- For When users are deleted, select Delete.
- For When user accounts are suspended, select Suspend.

-
Select Save.
Enable SAML SSO with OneLogin
To allow users to log in through your OneLogin SCIM integration, you must also set up SAML SSO authentication with OneLogin in Harness.
Provision individual users
With the OneLogin SCIM integration, don't change a provisioned user's email address in OneLogin. Once a user is provisioned in Harness, the user's email address must remain the same. If you change the email address in OneLogin and then try to remove the user from Harness, the removal will fail.
To provision users, add them to the Harness OneLogin app. Users are automatically provisioned in Harness if SAML SSO with OneLogin is enabled.
-
In OneLogin, select Users.
-
Add a user or select an existing user.
-
In the User Info settings, make sure First name, Last name, and Email are populated.
infoThe Harness OneLogin SCIM integration only accepts the First name, Last name, and Email attributes for users. No other user attributes are permitted. Don't configure any other User Info settings.
-
Save the user settings, and then go to Applications.
-
In the Applications list, select Add (+).
-
In the Assign new login settings, select the Harness OneLogin app, and then select Continue.
-
In NameID, enter the user's email address. This must match the Email from the User Info settings.
-
Select Save. The user's provisioning state is initially listed as Pending.
-
Select Pending.
-
In Create User in Application, select Approve. The user's provisioning state updates to Provisioned.
Once the provisioning state updates to Provisioned, the user receives an email invite from Harness to log in.
- In Harness, go to Account Settings, and then select Access Control.
- Select Users in the header, and make sure the provisioned user is listed.
- After provisioning users, you must assign permissions.
Provisioning errors
If provisioning fails, you might get an error such as Failed to create user in app. Specified resource (e.g. User) or endpoint does not exist. The most common cause for this error is an incorrect SCIM Base URL or invalid SCIM Bearer Token in the OneLogin app configuration
If an error prevents adding, deleting, or updating an individual user in Harness, resolve the issues that caused the error and then retry provisioning the user in OneLogin. Select the Failed state in the user provisioning status table in OneLogin to investigate the error and retry provisioning.
Provision OneLogin roles as Harness user groups
With the OneLogin SCIM integration, don't change a provisioned user's email address in OneLogin. Once a user is provisioned in Harness, the user's email address must remain the same. If you change the email address in OneLogin and then try to remove the user from Harness, the removal will fail.
To provision groups of users, you can provision OneLogin roles as Harness user groups. To do this, you must create a OneLogin role, assign OneLogin users to the role, assign your Harness OneLogin app to users, and then create a rule in your Harness OneLogin app that creates Harness user groups based on the role.
You can create multiple roles. Each role becomes a Harness user group.
-
Make sure none of the intended group members (OneLogin users) have standalone Harness accounts (meaning, accounts not associated with OneLogin). If a user has a separate Harness account, the OneLogin role provisioning will fail. Before provisioning OneLogin roles, make sure you remove these accounts.
-
Add the group parameter to your Harness OneLogin app.
- In OneLogin, go to your Harness OneLogin app.
- In the Parameters settings, go to Optional Parameters, and select Groups.
- In Edit Field Groups, select Include in User Provisioning, and then select Save.
- Select Save again to save the app configuration.
-
Add the OneLogin role and link it to the Harness OneLogin app.
-
Go to Users, select Roles, and then select New Role.
-
Enter a Name, and select Save. The role name becomes the user group name in Harness.
Group namesWhen provisioning user groups through SCIM, Harness creates names for user groups based on the OneLogin role name. If the role name contains periods, dashes, or spaces, those characters are replaced by underscores in Harness. For example, if a OneLogin role's name is
example-group, then the resulting Harness user group's name isexample_group.If a OneLogin-provisioned user group has the same name as an existing user group in Harness, Harness retains both groups. To prevent confusion, you can rename the existing Harness group.
-
Select your new role, and then select Users.
-
In Check existing or add new users to this role, enter the name of a OneLogin user to add to the role, locate the relevant user, select Check, and then select Add to Role. Repeat until you have added all users.
-
Select Save, select your role again, and go to the Applications settings.
-
Select Add Apps.
-
In Select Apps to Add, select the Harness OneLogin app.
-
Select Save.
-
-
Associate the Harness OneLogin app with each OneLogin user you added to the role.
- Go to Users, and select a user you added to the role.
- On the user's page, select Applications.
- Select Add App.
- In Assign new login, select the Harness OneLogin app, and select Continue.
- In Groups, select your OneLogin role, and select Add.
- Select Save.
-
Add a rule to the Harness OneLogin app that creates user groups in the Harness based on the OneLogin role.
- In OneLogin, go to Applications and select the Harness OneLogin app.
- Select Rules, and select Add Rule.
- Enter a Name.
- Under Actions, select Set Groups in [Application Name].
- Select Map from OneLogin.
- Set For each to Role.
- Set With value that matches to the name of your OneLogin role or enter the regex
.*. - Select Save to save the rule.
- Select Save to save the app.
-
Provision the users you linked to the Harness OneLogin app.
- Go to your Harness OneLogin app, and select Users.
- If you provisioned users prior to adding the OneLogin role and rule, select Reapply Mappings.
- For each user listed as Pending, select the user and select Approve.
-
Once provisioned, confirm the users and groups exist in Harness.
- In Harness, go to Account Settings and select Access Control.
- Select User Groups in the header.
- Select the user group matching the name of your OneLogin role.
- Make sure all the provisioned users are listed.
-
After provisioning groups and users, you must assign permissions.
Assign permissions
After user groups are provisioned through SCIM, you can manage permissions granted to the users in those groups by assigning roles and resource groups to user groups in Harness.
Harness roles and resource groups aren't managed in OneLogin.
If you need to change a user's group (for example, to change their permissions), you must change the user's role relationship in OneLogin.
Remove groups
To remove a user group created by a OneLogin role, you must remove the role from OneLogin and then contact Harness Support to get the user group removed from Harness.
The OneLogin SCIM integration doesn't currently automatically remove of user groups created from OneLogin roles. In Harness, if you try to manually remove a Harness user group created from a OneLogin role, you'll get the following error: Cannot Delete Group Imported From SCIM. This is why you must contact Harness support to finish removing the group after removing the OneLogin role.
Remove users
Once a OneLogin user is provisioned in Harness, you can't delete the user in Harness. You must delete the user in OneLogin to remove them from Harness.
I already have a Harness FirstGen OneLogin integration
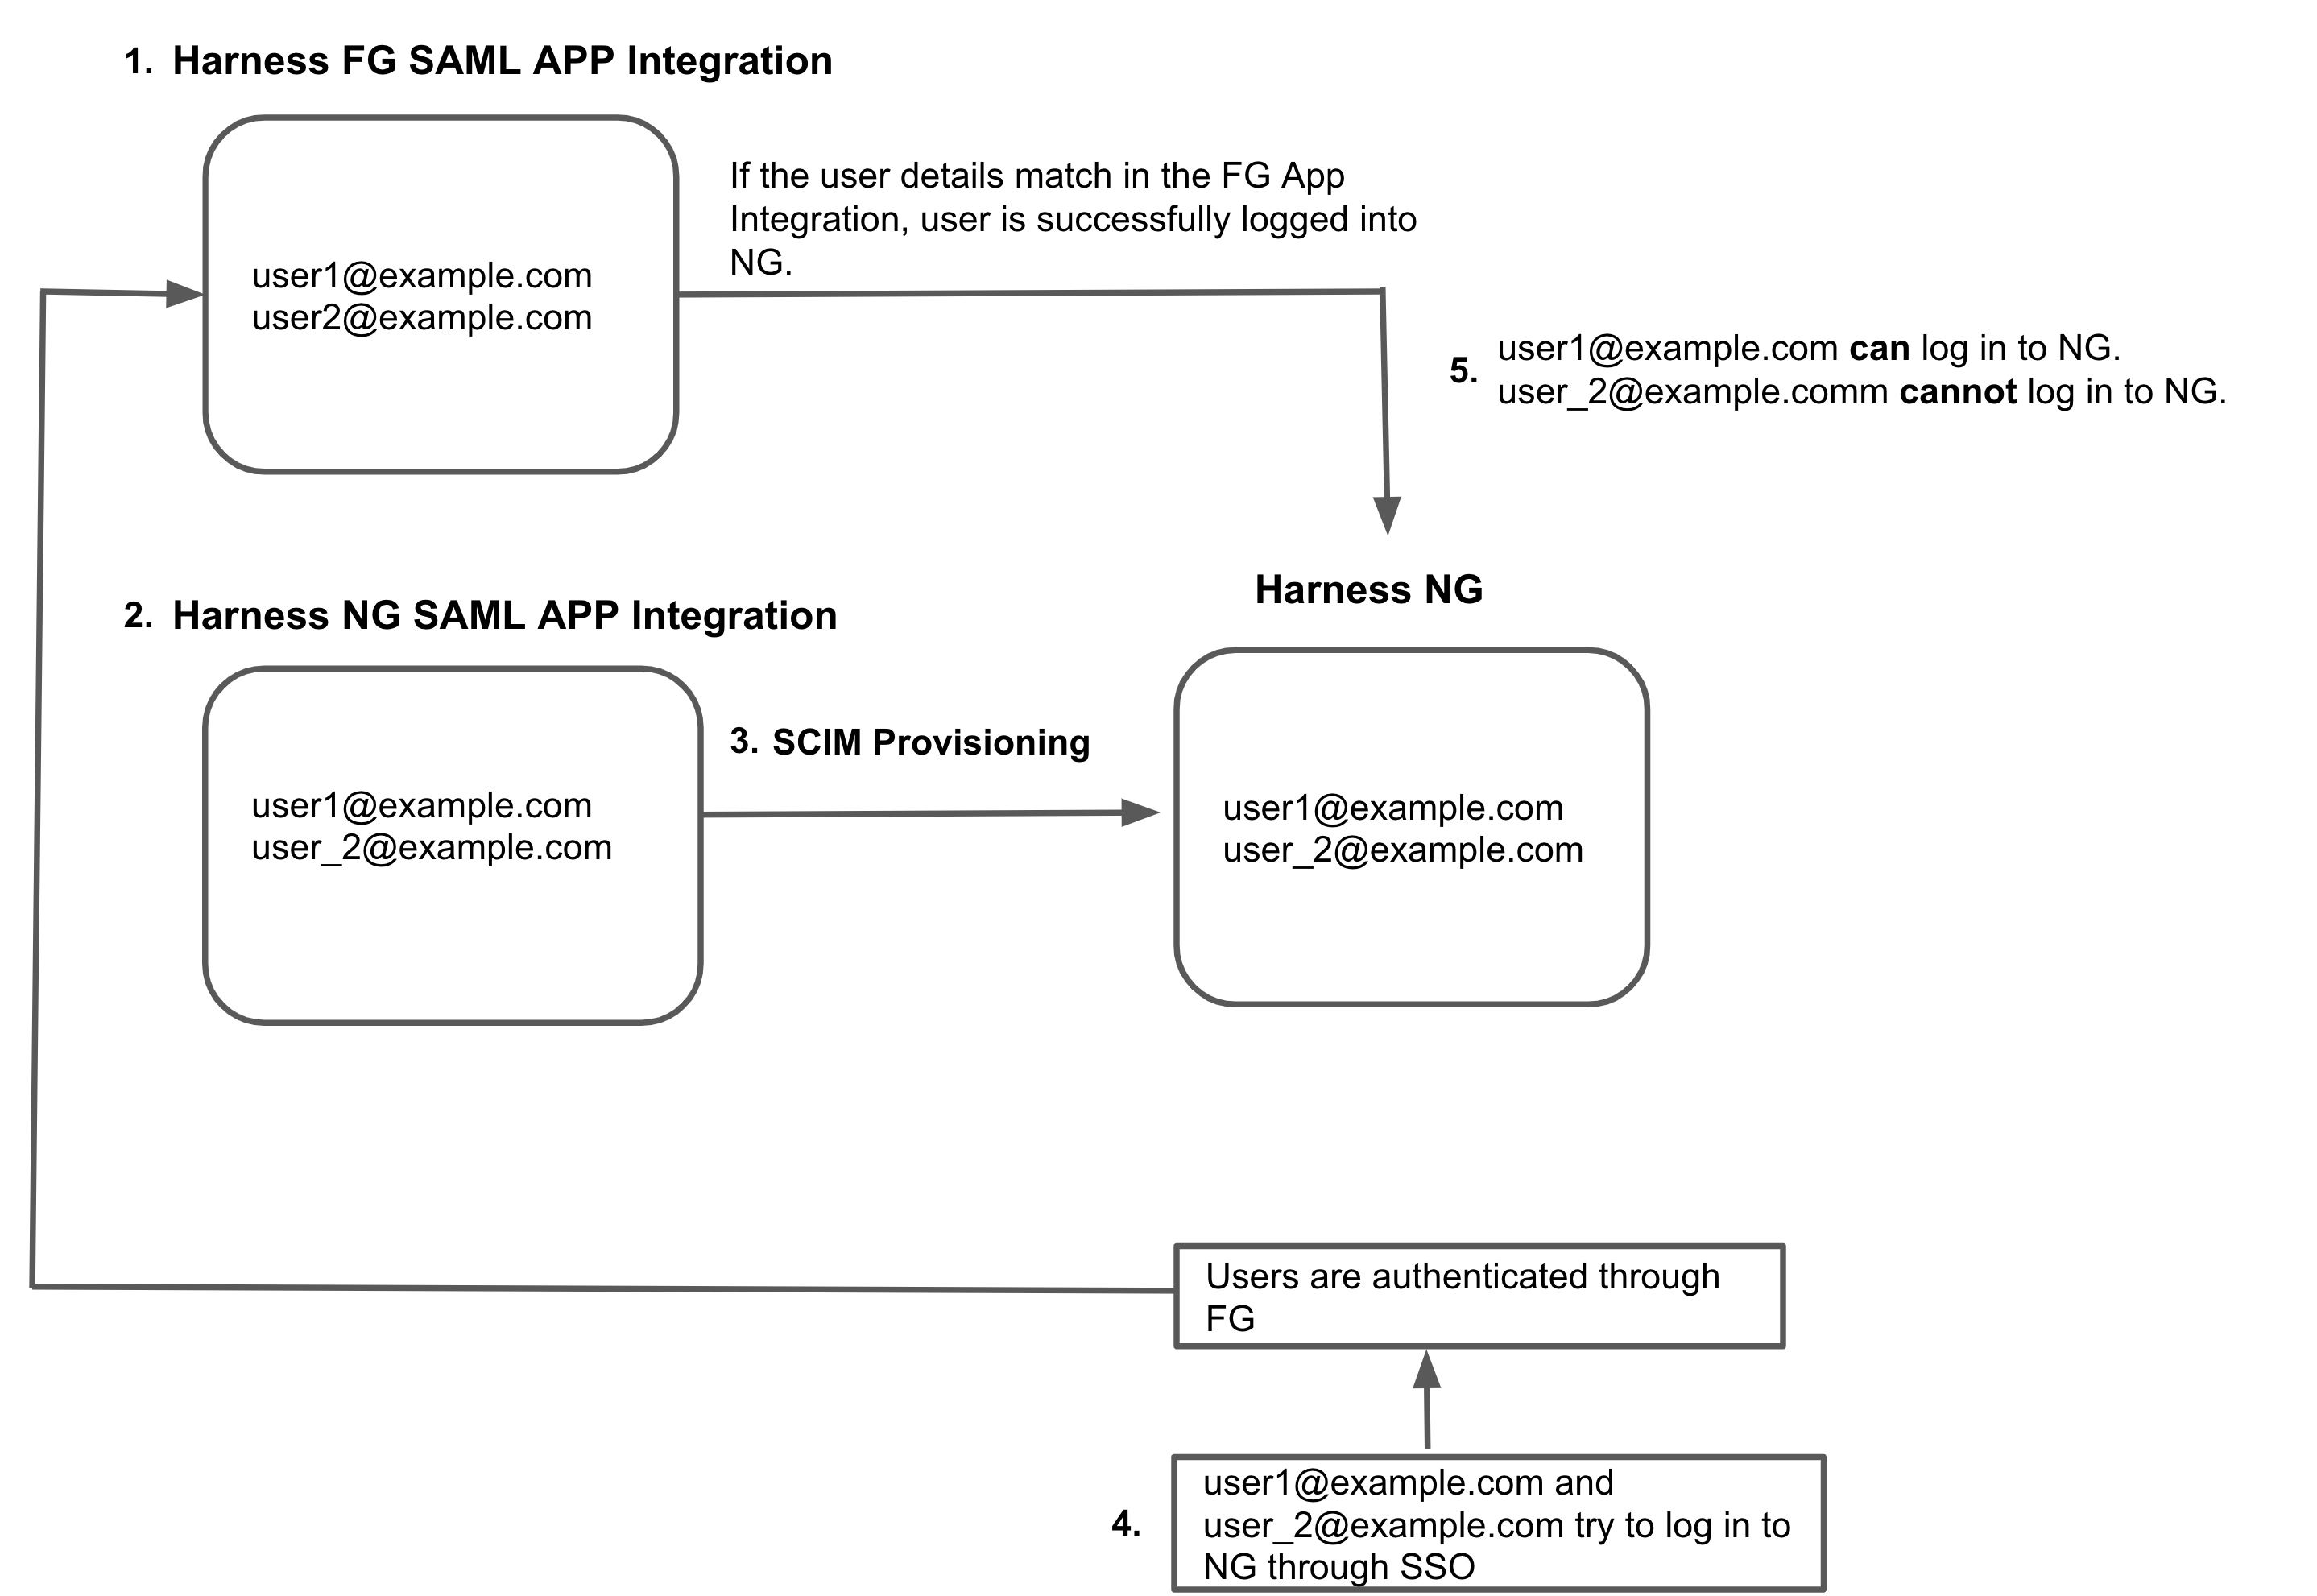
If you currently have a Harness FirstGen App Integration in your IdP, and you want to create one for Harness NextGen, make sure the user information is included in the FirstGen App Integration before attempting to log into Harness NextGen through SSO.
Harness authenticates users using either the FirstGen App Integration or the NextGen App Integration. If you have set up both, Harness continues to use your existing App Integration in FirstGen to authenticate users that attempt to log in using SSO.
For example:
-
An App Integration is already set up for FirstGen with two users as members:
user1@example.comanduser2@example.com. -
You create the App Integration for Harness NextGen, and you add
user1@example.comanduser_2@example.comas members. -
You provision these users to Harness NextGen through SCIM.
-
user1@example.comanduser_2@example.comtry to log in to Harness NextGen through SSO. -
The FirstGen App Integration is used for user authentication through SSO.
user1@example.comis a member of the FirstGen App Integration. They are successfully authenticated and logged in to Harness NextGen.user_2@example.comis not a member of the FirstGen App Integration. Authentication fails and the user can't log in to Harness NextGen.
